- Oct 22, 2024
How to Share SwiftUI Views Between Multiple Xcode Projects
- Mark Moeykens
- SwiftUI
One of the great features of SwiftUI and Xcode is the ability to share code across different projects.
This can be especially useful if you’re working on multiple apps and want to reuse common UI components.
In this guide, I’ll walk you through the process of:
How to set up the Swift Package
How to enable previews for your SwiftUI views within the Package
How to make your SwiftUI views visible outside the Package
How to add the Package to an Xcode project
How to use the shared SwiftUI view in your app
Step 1: How to Set Up the Swift Package
The first step in sharing SwiftUI views between projects is creating a Swift package to host the shared views.
A Swift package makes managing and distributing reusable code between different targets easy.
Creating the Swift Package
1. Open Xcode and select File > New > Package.

2. Choose any testing system you want or "None".
3. Name your package and click Create.
💡Note: If you had any existing Xcode projects open when you did step 1, you can choose to add this package directly to them using the Add to picker before you click the Create button.
4. After Xcode creates the package, you’ll see a Sources folder to add your shared SwiftUI views (or create subfolders within the Sources folder).
5 . Add your shared SwiftUI view somewhere inside the Sources folder.
Step 2: How to Update Package.swift to Enable SwiftUI Previews
Before you start adding views, you need to ensure that the package supports the required iOS version.
This also enables SwiftUI previews to work.
Update the Package.swift file to add platforms: [.iOS(.v16)], to the Package init:
// swift-tools-version: 6.0
// The swift-tools-version declares the minimum version of Swift required to build this package.

import PackageDescription

let package = Package(
    name: "MySharedView",
    platforms: [.iOS(.v16)], // TODO: Add this line to specify the minimum iOS version.
    products: [
        // Products define the executables and libraries a package produces, making them visible to other packages.
        .library(
            name: "MySharedView",
            targets: ["MySharedView"]),
    ],
    targets: [
        // Targets are the basic building blocks of a package, defining a module or a test suite.
        // Targets can depend on other targets in this package and products from dependencies.
        .target(
            name: "MySharedView"),

    ]
)💡Note: The platforms parameter is not included by default. You will have to add it to the Package init.
In this example, I specified a minimum iOS version of 16 but you can specify any iOS version you want.
Previewing Your SwiftUI View
Previews do not work in packages until you add that platforms parameter to the Package init above.
Once you add that parameter, you should see your SwiftUI previews working for your views.
Step 3: Make your SwiftUI View visible to other projects
By default, your SwiftUI view will not be visible to other projects outside the package.
To make your SwiftUI view visible to other projects using this package, you have to:
Make the
structpublic.Make the
bodyproperty public.Add a public
initto the view.
Here's an example:
public struct MySharedView: View {
    // The initializer must be public to be accessible by other projects
    public init() {}

    public var body: some View {
        Text("My Shared SwiftUI View")
    }
}
Step 4: Add the Package to another Xcode project
With the Swift package set up, the next step is to include it in your other Xcode projects.
Adding the Package to Your iOS App
💡Note: You can skip this step if you select an open Xcode project when first creating the Package up above.
Open the iOS app project where you want to use the shared SwiftUI views.
Select the project in the Xcode navigator and then go to File > Add Package Dependencies….
Click the Add Local... button or its Git repository URL if you’re hosting it remotely.
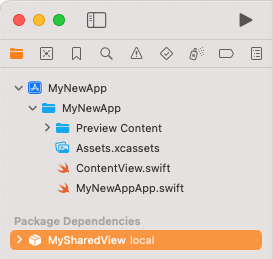
Once the package is added, it will appear under Package Dependencies in the project navigator.
Step 5: Use the shared SwiftUI view in your app
Now that the package is added to your project, you can start using the shared SwiftUI view.
There are two steps:
1. Import the package in your SwiftUI file:
import MySharedView2. Use the shared view in your app, just like you would with any other SwiftUI view:
struct ContentView: View {
    var body: some View {
        VStack {
            Text("This is the shared view:")

            MySharedView()
        }
        .padding()
    }
}
The preview should be able to render the shared view.
