- Mar 19, 2024
How Can You Use Sheets in SwiftUI?
- Mark Moeykens
- SwiftUI
In SwiftUI, sheets slide up from the bottom of the screen, covering the current view and focusing the user’s attention on the new content.
But how can you use them effectively in your SwiftUI apps?
Basic Usage
Attach a .sheet modifier to a view and provide it with a binding to a Boolean that determines whether the sheet is presented or not.
Here’s a simple example:
struct ContentView: View {
@State private var isShowingSheet = false
var body: some View {
Button("Show Sheet") {
isShowingSheet = true
}
.sheet(isPresented: $isShowingSheet) {
SheetView()
}
}
}
struct SheetView: View {
var body: some View {
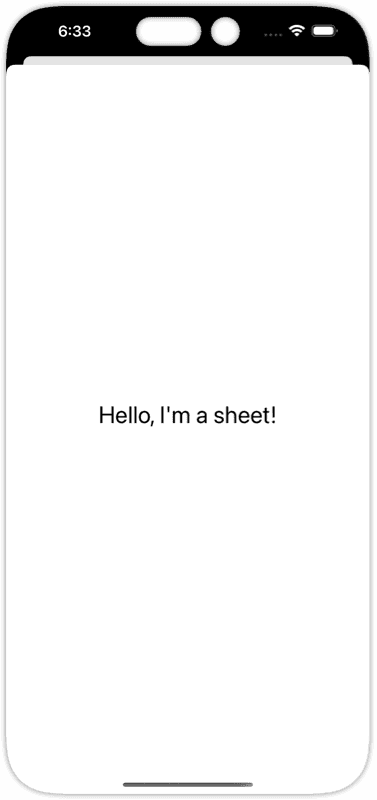
Text("Hello, I'm a sheet!")
}
}In this code, tapping the “Show Sheet” button sets isShowingSheet to true, which triggers the presentation of the SheetView.
onDismiss - Taking action when dismissing the sheet
The onDismiss parameter allows you to provide a closure that will be executed when the sheet is dismissed.
Here’s an example:
struct DismissingSheetsView: View {
    @State private var isShowingSheet = false
    @State private var feedback = ""

    var body: some View {
        VStack {
            Button("Show Sheet") {
                isShowingSheet = true
            }
            .buttonStyle(.borderedProminent)

            Text(feedback)
        }
        .sheet(isPresented: $isShowingSheet, onDismiss: {
            feedback = "Thank you!"
        }) {
            SheetViewWithDismiss()
        }
        .font(.title)
    }
}

struct SheetViewWithDismiss: View {
    @Environment(\.dismiss) var dismiss

    var body: some View {
        Button("Dismiss") {
            dismiss()
        }
    }
}
When the “Dismiss” button in the
SheetViewWithDismissis pressed, the sheet is dismissed and the message “Thank you!” is shown.The sheet modifier's
onDismissclosure is called when the sheet is dismissed.

This can be useful in many scenarios where you want to perform some action when the sheet is dismissed, such as:
Resetting some state.
Giving the user a confirmation that something was done.
Providing direction after an action.
Use-Case Scenarios
Sheets in SwiftUI can be used in a variety of scenarios:
Data Input: Sheets are a great place to gather user input. For example, you might present a sheet when the user needs to fill out a form.
Detail Views: If you have a list of items, you can use a sheet to present a detailed view of an individual item.
Settings: You can use a sheet to present app settings or preferences.
Informational Messages: If you need to present an informational message or tutorial to the user, a sheet can be a good choice.
Learn More
In the book SwiftUI Views Mastery, you can learn more about sheets, including:
How to present sheets using an Identifiable object (helpful for showing object data)
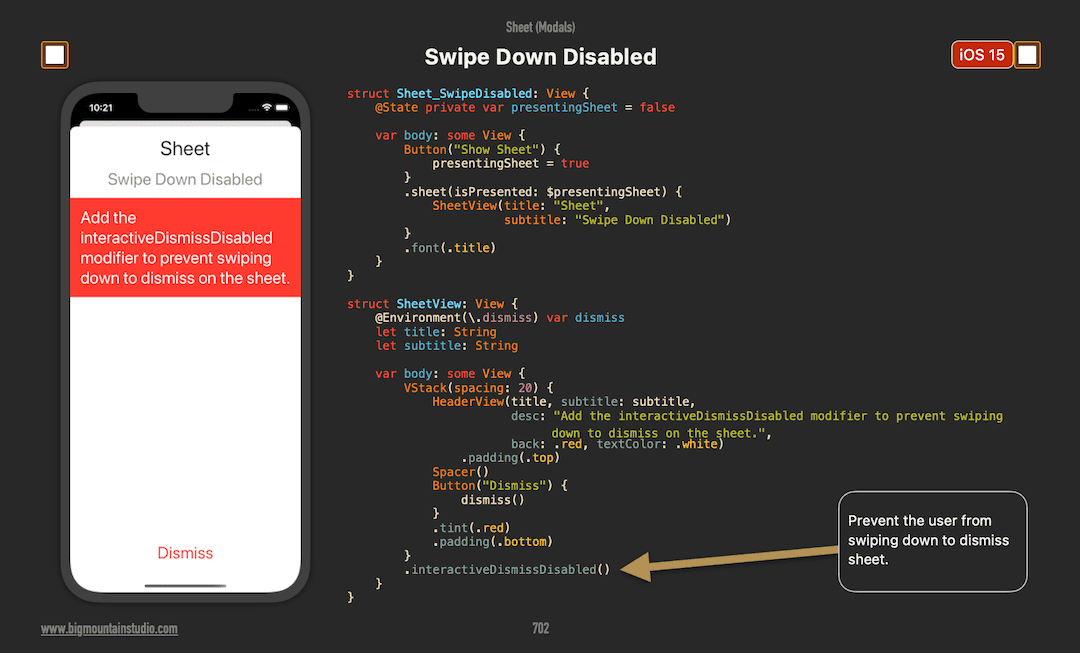
How to disabled the swipe-to-dismiss gesture on sheets (see page below)
How to control how high the sheet goes up (by default it is full screen but you can make it as short as you want)
How to give your sheets multiple stages of height to fit your sheet content
How to add or hide a drag indicator on your sheet
How to customize the sheet's corner radius and background style
(From SwiftUI Views Mastery picture book - Get your copy today and save 11%!)
🌟 Special Offer: SwiftUI Enthusiasts to Save 11%! 🌟
As a thank you for reading our blog, we're thrilled to offer you an exclusive 11% discount on all our SwiftUI books!
📚 Use coupon code POSTS_11 at checkout or just click this link bigmountainstudio.com to claim your discount.
(Note: Coupons cannot be used during sales.)

Your Learning Path Quick Links (Save 11%)
Create UI with SwiftUI Views Mastery (beginner)
Architect your app using SwiftUI Essentials (beginner)
Improve your app's UX with SwiftUI Animations Mastery (junior)
Save & sync your app's data with Core Data Mastery -or- SwiftData Mastery (junior)
React to and manipulate data using Combine Mastery in SwiftUI (advanced)