- Jan 30, 2024
What are 4 Ways to Refresh a View in SwiftUI?
- Mark Moeykens
- SwiftUI
Learn 4 ways to refresh views in SwiftUI.
Method 1: @State
Use Case: Refreshing a view by updating
@Stateproperties, like tapping a button.-
Code Snippet:
struct Refresh_Data: View { @State private var data = Date.now var body: some View { VStack { Text(data.formatted(date: .omitted, time: .standard)) Button("Refresh") { data = Date.now } .buttonStyle(.borderedProminent) } .font(.title) } } Explanation: Here, the
@Stateproperty wrapper is used. Tapping the button updates thedatavariable, triggering the view to refresh.
(Learn more ways to format dates in the SwiftUI Views Mastery picture book.)
Method 2: @Observable
Use Case: Updating the view when data changes in an observable class (e.g., fetching from an API).
-
Code Snippet:
@Observable class RefreshObservableObject { var data = Date.now func fetchData() { data = Date.now // Getting data from an API or some other source } } struct Refresh_ObservableData: View { @State private var oo = RefreshObservableObject() var body: some View { VStack { Text(oo.data.formatted(date: .omitted, time: .standard)) Button("Refresh") { oo.fetchData() } .buttonStyle(.borderedProminent) } .font(.title) } } Explanation: The
@Observablemacro on theRefreshObservableObjectclass ensures that any changes made to its properties are observed by the view so the view will update.
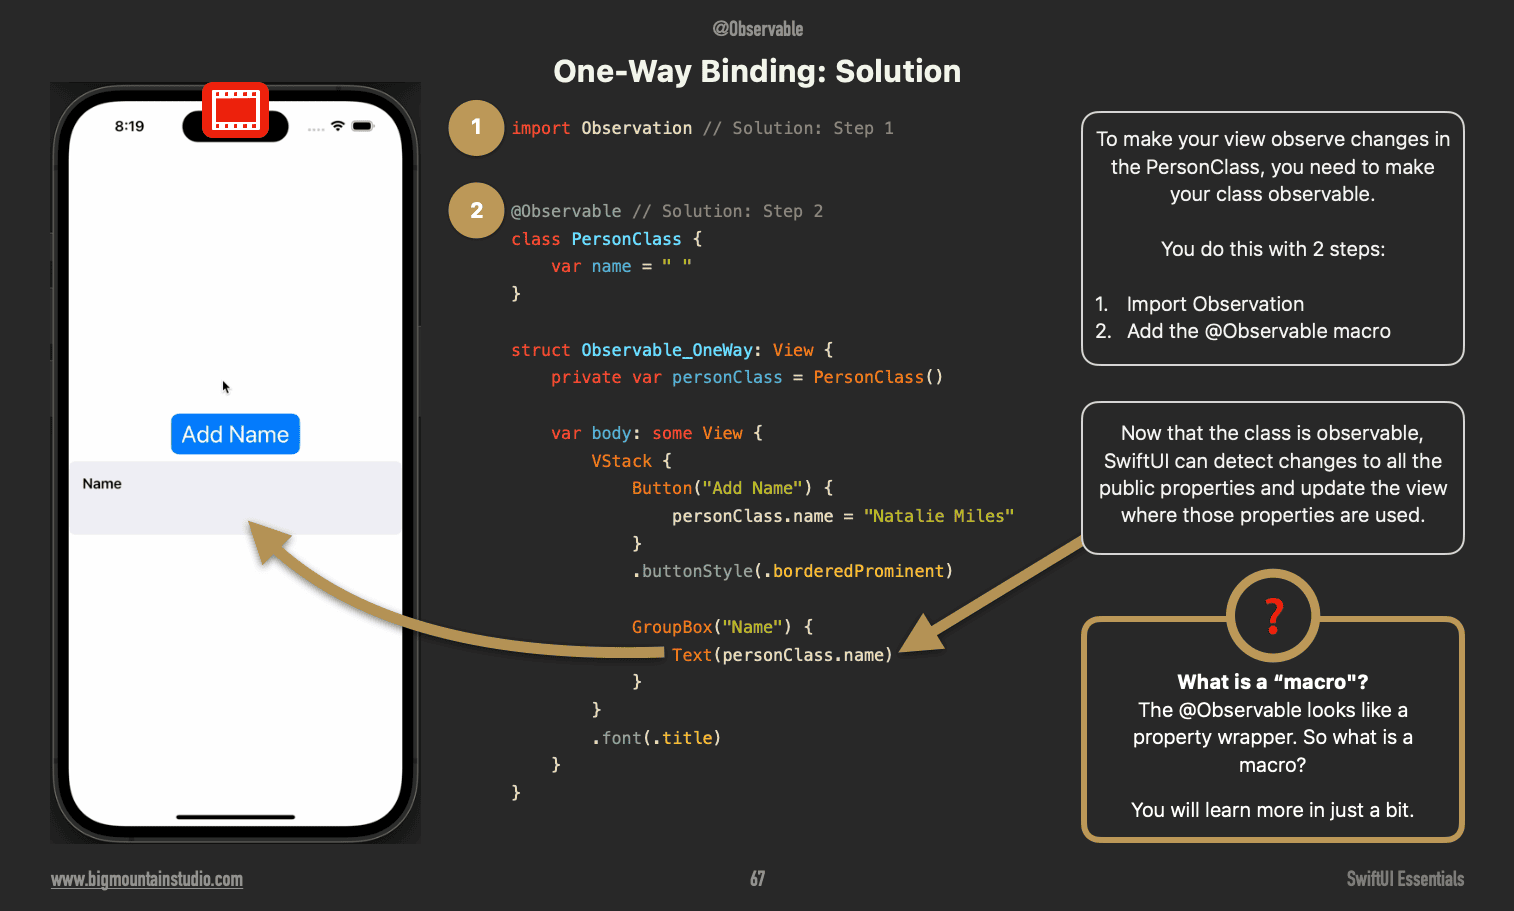
(Learn more about binding to observable classes in the book SwiftUI Essentials: Architecting Scalable and Maintainable Apps)
Method 3: Using Refreshable on a List
Use Case: Implementing a pull-to-refresh mechanism.
-
Code Snippet:
struct RefreshableListView: View { @State private var data = Date.now var body: some View { List { Text(data.formatted(date: .omitted, time: .standard)) } .refreshable { await fetchData() } } func fetchData() async { data = Date.now } } Explanation: SwiftUI’s
.refreshablemodifier adds pull-to-refresh functionality to theList. Any code in the refreshable closure is run and can be used to refresh the view.

(Learn more about Lists and refreshable in the SwiftUI Views Mastery picture book.)
Method 4: Using the id Modifier
Use Case: When you need to force refresh the view because there is no other way to do it. (Last resort.)
-
Code Snippet:
struct Refresh_WithId: View { @State private var refreshView = false var body: some View { VStack { Text(Date.now.formatted(date: .omitted, time: .standard)) .id(refreshView) Button("Refresh View") { refreshView.toggle() } .buttonStyle(.borderedProminent) } .font(.title) } } Explanation: SwiftUI’s
.idmodifier gives a view an identity. When you change that identity, you are telling SwiftUI it is now a different view and SwiftUI will refresh it and draw it again.💡Note: It does not matter what you change the value of the id to, as long as it changes.
🌟 Special Offer: SwiftUI Enthusiasts to Save 11%! 🌟
As a thank you for reading our blog, we're thrilled to offer you an exclusive 11% discount on all our SwiftUI books!
📚 Use coupon code POSTS_11 at checkout or just click this link bigmountainstudio.com to claim your discount.
(Note: Coupons cannot be used during sales.)

Your Learning Path Quick Links (Save 11%)
Create UI with SwiftUI Views Mastery (beginner)
Architect your app using SwiftUI Essentials (beginner)
Improve your app's UX with SwiftUI Animations Mastery (junior)
Save & sync your app's data with Core Data Mastery -or- SwiftData Mastery (junior)
React to and manipulate data using Combine Mastery in SwiftUI (advanced)